Cast iron cooking is a skill that should be in any camping mama’s repertoire. There’s not much better than a savory meal cooked around a campfire in your trusty Dutch oven. Except perhaps kicking back in the hammock while someone else cooks said meal.
If your camp kitchen hasn’t included cast iron cookware in the past, now is the time to pack away the hot dogs and cold sandwiches, and read on for a guide to hot, hearty deliciousness.
Looking for more outdoor kitchen tips? Check out all of ours here!
Cast Iron Cooking: It’s as easy as 1, 2, 3
Sadly, it has taken me several years to feel comfortable using and caring for my cast iron cookware. There is a lot of confusion out there about what to do and what not to do lest you ruin your cast iron. Let me put your fears to rest:
Cast iron is as TOUGH AS NAILS. We’re talking about a seamless slab of solid iron. This means that, unlike other pots or pans, you can use it on a stovetop, in the oven, or over a campfire. It also means it lasts forever and is really, really hard to damage.
My husband once retrieved a 12” cast iron skillet from a dumpster that was covered in rust—he was excited, I was skeptical.
Sure enough, using the simple method outlined below, we scrubbed that baby up and gave her a few coats of seasoning and now she gets used so much in our home that she has a permanent spot on the stovetop.
Whether you buy new cast iron cookware or you are restoring an old piece, all you have to do is
- Season it
- Cook with it
- Keep it clean and dry
And you’ll have a new favorite piece of cookware that will last the rest of your life. (And your kid’s lives… and your grandkids…)

What is seasoning?
If we took a microscopic look at the surface of a cast iron pan, we would see not a perfectly smooth surface but one with lots of pores and imperfections.
Seasoning is the glossy, non-stick protective coating that develops when fats are heated up. This causes them to quickly undergo a process called polymerization in which the molecules bond to each other and the iron, filling in the pores and creating a smooth surface.
For this reason, unsaturated fats (those that are liquid at room temperature, such as cooking oils) are preferred over saturated fats (those that are solid at room temperature, such as lard and shortening) for seasoning your cast iron.
Unsaturated fats have more reactive carbon-carbon double bonds which cross-link to form the polymer matrix which makes up the layers of seasoning. You’ll find numerous recommendations out there for what type of oil is best to use for seasoning; plain ol’ vegetable oil will work just fine.
How to season cast iron
Alright, now that you get the idea, here’s a step-by-step guide on how to initially season your cast iron, or how to restore seasoning to an old piece. (I’m using our 14” skillet from Camp Chef here, but the same rule applies to your Dutch oven or any other cast iron cookware.)
1. Strip it down
Unless you’re just adding additional layers of seasoning to the top of a new, pre-seasoned piece, you’ll want to start with a totally blank slate.
To remove old seasoning, lye or oven cleaner will do the trick (be careful—concentrated lye is very caustic so you’ll want to wear gloves and take care).
To remove rust, use some distilled white vinegar and steel wool, making sure to remove every spot of rust completely.

A little elbow grease here and you should have a good starting point. Wash your skillet with soap and rinse thoroughly.
You’ll want to start with a dry skillet, so I like to heat my oven up to about 200 degrees F and set the skillet in there for about 10 minutes (this also gets a jumpstart on preheating the oven as well as your pan).
2. Coat it with oil
Once your pan is dry, pull it out and turn the oven up to 400 degrees F. While that is preheating, pour a small amount of oil into your skillet and use a rag or paper towel to spread that over every surface of your pan, including the bottom, rim, and handle.
Like I said, this is one big slab of iron and you want your whole skillet to be protected.

Once it is covered, take a new paper towel and wipe away the excess oil. This is very important! The goal here is to build up multiple thin layers of oil—if you try to lay it all on in one go you will end up with a sticky pan and excess oil which can turn rancid.
So continue to wipe away the oil until your pan looks dry again. (Don’t worry, the thin layer is still there filling in the grooves, which is what we want!)
3. Set it and forget it
Once your oven is preheated to 400 degrees F, place your skillet upside-down on the middle rack. (Ideally, you shouldn’t have any excess oil to worry about, but turning it upside-down prevents any oil from pooling up in the pan.)

Leave the pan in for 1 hour, then turn the heat off but leave the skillet in the oven until it is completely cool.
I use the auto-cook feature on my oven so that I can set it to one hour and then forget about it. The oven will turn itself off and the pan can sit until you come back to retrieve it.
4. Repeat
To get a good base layer, you’ll want to repeat this process a couple times. In the end, you want a smooth, glossy finish on your skillet which will be the foundation to protect your cast iron from rust and create a nonstick surface for cooking.

Now, go cook with your cast iron
This process of seasoning your cast iron in the oven is not something you have to do every time you use it. You get a good initial base coat of seasoning down and then you use your pan. That’s it.
By continuing to cook with it at camp or at home, you will add more thin layers over time which will build up that protective coating and make your cast iron better and better.
How to keep your cast iron clean and dry
Once you have your cast iron seasoned, you want to keep it that way. Rest assured, that is not as hard as some people make it out to be.
Wash your skillet after it has cooled down but is still warm. Pour water into the pan and use a scrub brush or gentle scraper to clean away all the cooked-on food. Don’t use steel wool or abrasive scrubbers which can wear away your seasoning.
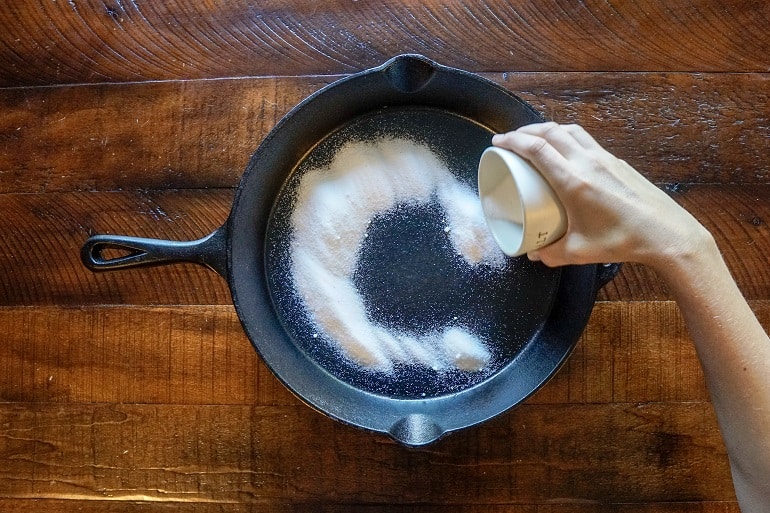
If needed, the scrubber on the back of your sponge will work fine, or you can use coarse salt as a safe abrasive—just pour about a half cup into your pan then scrub it around with a paper towel and rinse.
Yes, it is ok to use soap.
Typical dish soaps today are gentle and do not contain harsh lye like they did back in the good ol’ days. Remember that the seasoning has undergone a chemical reaction which bonds the oils to the pan and prevents the surfactant molecules in the soap from stripping them away.
That said, the soap is not necessary and it will wash away that lovely leftover bacon grease rather than saving it as another layer of seasoning on your cast iron.
But you need a clean pan, so if you’ve got some tough stuck-on food then don’t be afraid to use a little soap.
Once the pan is clean, rinse it and make sure it is dried COMPLETELY.
Water is the biggest enemy of cast iron—if left sitting on the pan it will work through your seasoning and cause rust. Towel off your pan and place it over the campfire (or on the stovetop or in the oven if you’re at home) for a couple minutes to make sure it is totally dry.
If you notice your seasoning needs a primer (you’re losing your glossy, non-stick surface), you can rub it down with another thin layer of oil after washing and place it on the campfire until it just starts to smoke, then pull it off and let it cool.
And that’s it!
It really is easy to take care of cast iron, and it’s such a great piece of cookware to have in your arsenal. Just keep using your pan and it will happily elevate your camp cooking game to a whole new level. It’s time to set your sights on hot breakfasts with eggs and sausage, Dutch oven pizzas, warm cornbread over chili….. the possibilities are endless!

Pin it:
© 2019, Tales of a Mountain Mama. All rights reserved. Republication, in part or entirety, requires a link back to this original post and permission from the author.