Cargo Trailer Camper Conversion
We never thought RV camping was in our future, until we had kids. We were tent campers for many years and never wanted a big trailer/RV to go “glamping,” that just wasn’t our style. But two kids later, we were intrigued by the ease of RV camping, especially because I am pretty sure it rains every single time we camp.
We also really enjoy camping in the fall, which in the Midwest can be cold and rainy. The thought of having a warm, dry spot to come back into was very alluring. We had been discussing building out our own camper, but didn’t have the time and resources. We kept looking at used travel trailers online, but never found anything we really liked for the money.
Finally in 2020, we stopped talking and started doing. We took the plunge and ordered an empty cargo trailer since we could utilize all our new “free time” to build out our own.

As an Amazon Associate and member of other affiliate programs, we earn from qualifying purchases.
Why Did We Choose to Build Our Own Cargo Trailer Camper?
Why did we want to subject ourselves (my husband really) to hours (years, really) of work, frustration, and design? In short, to get what we wanted for our needs and only what we needed.
We Already Experienced the Convenience and Flexibility
My first experience with the cargo trailer camper was with my in-laws. They had this blue cargo trailer with a few cabinets in the nose, fold down bunks along the sides and a fold down table. A pretty no frills set-up, but served their purpose for deer hunting camp. When the bunks were folded up, they opened the rear cargo door and could drive the four-wheeler in and pack up all the supplies.
A few years after I met my husband, his parents purchased a newer cargo trailer to build out into a camper. Version 2.0 was luxurious compared to the blue trailer! And it was just as functional, beds folded up, carpet rolled up and you could drive the four-wheeler in the ramp door.
Every now and then we would utilize one of these trailers for camping trips, and it was so convenient with little kids. Especially having a warm, dry spot to sleep and running water to clean up any messes. We decided it was time to get our own.
Specific to Our Needs – Only the Features We Needed
New campers come with so many features, many of which we feel we didn’t need or wouldn’t use. We didn’t need an indoor stove, oven, microwave, TV, fireplace, massaging chairs or whatever else comes in RVs these days. We also didn’t think we needed a fridge or a bathroom. Basically we just wanted a hard shelter with heat, lights, running water, and a place for our gear.
Most toy-hauler RVs are just campers with a drop down rear door with a lot of particle board. Building our own allowed us to put in the materials we wanted to make this a solid trailer that is meant for hauling toys, but we can also sleep in.

Cheaper and Lighter Than a Factory Built RV
For a similar size toy hauler travel trailer from an RV company, you are looking at a $50,000+ price tag. All in, we are just over $20,000. $12,500 for the trailer and an additional $8,000 for the supplies and materials. And we are not paying for the things we don’t need!
By choosing an aluminum frame trailer, our empty starting weight is 2,500 lbs. Fully built we are probably around 4,000 lbs. For a 28ft toy hauler travel trailer, the weight is listed at 7,200 lbs… and you haven’t even put your “toy” in it yet which will add 500-2,000 lbs or so.
The lighter weight also saves us gas money since we are not towing any unnecessary weight.
Turning a Cargo Trailer Into Camper
Choosing a Cargo Trailer for a Camper
The first step was finding a trailer. My husband researched lots of aluminum frame trailer companies, but ultimately we decided on Neo Trailers. We felt like they were offering a quality product at a decent price, and we could make the customizations to get the trailer that we wanted.
We started with the Neo NAM1875 which is a tandem axle 18 foot box plus a V-nose and 7.5 feet wide. We added on things like bracing the roof for an AC unit, RV side door, slide out step, factory installed awning, spare tire and mount along with custom colors. We also swapped the 24″ on center floors for 16″ to give more rigidity, added the 3/4″ plywood walls and added 6″ of interior height for plenty of headroom for my 6’2″ husband.
The size of the trailer also allows us to drive our quad in with ease, but also have room for a side-by-side if we decided to get one in the future when the girls are a little bigger.
Once ordered, we picked it up about 7 weeks later and got to work. While we were waiting, we ordered a lot of the items needed for the trailer like the hot water heater, furnace, water tank, windows, etc.

Cargo Trailer Camper Layout
This was one of the more challenging tasks. We had a rough idea of how we wanted to lay it out, but when you start factoring the logistics with the plumbing, ductwork, electrical, and weight distribution it got a little challenging.
We knew the beds would be in the back and the kitchenette in the front. But we also had to figure out what size windows and where we wanted to put them. We used masking tape on the floor and cardboard cutouts for the windows to give us some visualization before we started any demolition and construction.

Building Our Cargo Trailer Camper
The first thing we did when we got the trailer home after our layout mock up was start disassembling the inside. We had to take down all the sidewall plywood so we could insulate and then cut holes for the windows and vents.
The very first hole we cut was in the ceiling for a roof vent, mostly so we could get some airflow when working in the tin can.


Insulation and Windows
We insulated the side walls with one layer of 1″ pink foam board. The ceiling got two 1″ layers of pink foam board. The underside of the trailer was spray foamed by a local insulator.
Once we got the insulation done, we started cutting the holes in the walls, hung the plywood back up and installed the four windows. Greg also coated the floor and ramp with an epoxy paint for waterproofing and durability.


Electronics and Power
The whole trailer runs on two 6v golf cart batteries wired in series to provide 12v power. We wanted to be able to power up without having to plug in, so we installed two solar panels on the roof and hooked them to our power center inside. We also have a shore power hook-up for when we can plug in or if we need to power back up with our generators due to limited solar charging from clouds or trees.
The entire trailer can run on one 2200W inverter generator with the exception of the rooftop air conditioner. We chose a Coleman Mach 8 RV air conditioner for the low height which allows us to still get the trailer in a 10ft tall garage door.
To run the A/C unit we purchased two Honda 2200W inverter generators that can be linked together. This allowed us to bring one generator if we need power but not A/C and is much lighter than one larger unit. Two individual generators also give us flexibility for home use if needed.
We installed LED lights inside and out, including some fun color changing rock lights under the trailer.


Utilities
We new we wanted and indoor sink with hot water and forced air furnace. We also added an outdoor shower that has come in very handy. We have two 30 lb. propane tanks on the front that fuel our furnace and hot water heater. In the nose there is a 30 gallon water tank which gives us enough water for 3-5 days depending on use.
We opted for an external gray tank so we did not have an internal holding tank to deal with and no sewer to dump. Our only waste water is from our kitchen sink (dish water, hand washing, and toothbrushing water.)


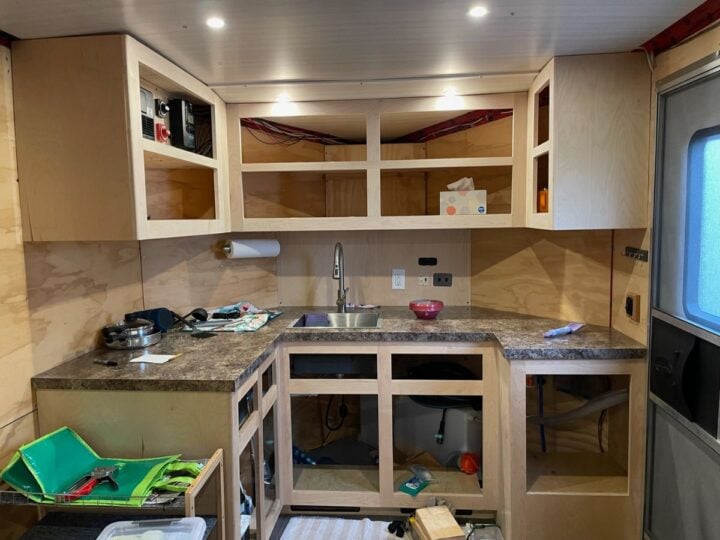
Cabinets and Beds
The cabinets in the front will hold most of our kitchen and camping supplies once they get their doors. The cabinets, power center, and counter top was all custom built by my husband in our garage (he’s pretty talented!)
The beds in the back can fold up flat to the wall with the mattress to allow for easy loading and unloading of supplies. Being able to evenly distribute our heavy items (like our cooler) helps with the weight distribution when towing.
We went back and forth on double double bunk beds on each side or just single fold down beds. We ended up choosing just single beds on each side. This allowed our beds to sit up a higher and be a comfortable sitting height with room under for storage and not feeling cramped overhead.

Camping in Cargo Trailer – What Works for Us!
Cooking Outside and Eating Mostly Outside
We didn’t want to dedicate counter space for a built in kitchen since we primarily wanted to cook outside anyway. We sometimes eat breakfast inside on chilly mornings, but most of our meals we eat outside the trailer at the picnic table.
We set up a folding table under the awning and set up our camp stove on it it along with our drawers that hold cooking utensils, paper plates, etc. We have plenty of room for prep and cooking. We love our mat under the awning for keeping things clean.


Disc-O-Bed Cots for the Kids for More Versatility
Since we didn’t do double bunks in the trailer, we decided on a different route for the kids.
For the girls, we set up the Disc-O-Bed Kid-O-Bunk cots for the girls along one of the walls. We like that they are removable, so if we get an elusive camping trip without kids or Greg takes the cargo trailer camper for a hunting trip, we don’t have empty bunks taking up space.
They are also lightweight and easy to move around the trailer if needed.
Check out our full review of the Kid-O-Bunk here.
Roll Carpet Back to Access Floor Anchors
The carpet we put in is just some inexpensive carpet with the pad attached. The floor of the trailer has L-track in it, so when we need to access it, we just roll the carpet back. Greg even made a fork mount bike rack that attaches to the L-track and can also go in the bed of our pick-up when we get to our destination.
We also have a four-wheeler, but we haven’t put in in the trailer yet. However, when we are ready, we will fold up the bunks and just roll the carpet towards the nose, drive the quad in and then secure it to the L-track.

Would We Do it Again?
We are hopeful this trailer will last us for many years to come, but I don’t know if we would build our own again in the future. It is a lot of time, work, and brain power (for my husband), and of course, projects never seem to go fully according to plan. But, we will make that decision when the time comes.
We are hoping this spring to finish up the cabinet doors, modify the bunk design a little for easier folding and support, insulate the wheel wells and do something with the walls so they are not just plywood. I also have hopes of a little fold down table for eating inside, we will see!
We are three years into this project and looking forward to completion! We started in June 2020 and hoping to be completely finished by June 2023.
Definitely one of the negatives to building it on your own, you have to squeeze work on the trailer in between real work, activities, vacations, and weather. Not easy. However, it hasn’t stopped us from using it!
Our first trip was October of 2020. We had an insulated trailer with lights and heat at this time. No cabinets, counter top, or running water, but we stayed warm and dry!

Factory Built Alternatives to a DIY Cargo Trailer Camper
Some better “toy hauler” RVs are on the market now, but they come with a price tag. One option we would potentially consider is ATC Trailers. They are built like a cargo trailer on an aluminum frame with camper features versus built like a travel trailer camper with cargo hauling features (with lots of particle board). If this one ever needs replacing, we would probably consider something along these lines before building our own again.
Related Articles:

Cargo Trailer Camper Conversion
© 2023, Tales of a Mountain Mama. All rights reserved. Republication, in part or entirety, requires a link back to this original post and permission from the author.